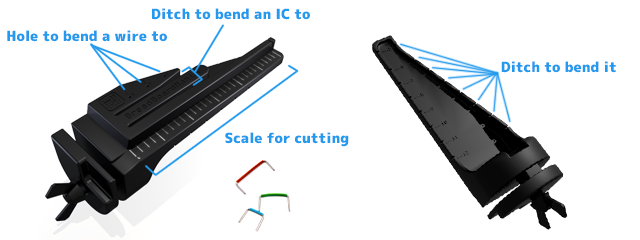
The wire stripping gauge is the tool that enables you to efficiently and precisely prepare wires used with a solderless breadboard. It’s successfully funded on Kickstarter.
When you make a circuit on a breadboard, didn't you ever experience you failed to finish joining in attempting to hook up the lead to the breadboard without cutting extra length of lead? Or, when you cut the lead and try to hook it to the breadboard, didn't you ever get frustrated by different lengths of each leads? Here is the answer for you, Wire Stripping Gauge!

Take your gauge, and try to use it by the following steps.
1.Attach the Wire Stripping Gauge on a wire stripper.
2.Anchor a piece of wire to the gauge and strip the covering with the stripper.
3.Bend the part without covering by 90 degree with the hole on the gauge.
4.Measure the wire with the scale, and cut it into the desired length.
5.Anchor the other side with covering to the gauge and strip the covering.
6.Bend the part that got stripped of covering by 90 degree.
7.And complete!
Features
The gauge has a graduation with 2.54mm pitch in order to cut the wire precisely.
The pair of ditches to bend the legs on an IC inward, and the holes that make it much easier to bend a short wire.
Even on the back of the tool, there are some ditches to bend a resistance into desired length.
Specification
The gauge can be attached on a wire stripper with a blade that's 4mm or less in thickness, and 30mm or more in length.
Usage
You can cut the jacket to the same lengths;
You can cut the wiring to any length you like;
You can bend the lead even if it’s only short wide left;
You can bend the wiring to any length you like;
You can adjust the position of the legs on IC.
Most store-bought wire stripper can be fixturable;
Any further questions, please contact main[at]breadboardmaniac.com


